【Unity】Zenject (Extenject) を使った自動テストを紹介

- 概要
- 環境
- Zenjectにおける自動テスト種別とそのポイント
- テストシチュエーション
- テスト種別それぞれの実装例
- サンプルプロジェクト
- 雑感
概要
Zenjectを使った自動テスト(UnitTest, IntegrationTest, SceneTest)を試してみたので共有します。
ちなみにZenjectはUnity向けのDependency Injection(以下DI)ライブラリです。
ある程度DIとZenjectに親しみのある人向けになりますが、サンプルコードはシンプルにしてますのでZenject実装の参考にもなるかと思います。
基本的にはWriting Automated Unit Tests and Integration Testsに準拠しますが、補足などや注意点なども併せて紹介します。
記事の最後にサンプルプロジェクトを載せておきます。
環境
- Unity 2019.4.0f1
- Extenject Version 9.2.0
- Extenjectは現在保守されているZenjectのForkプロジェクトです
- 詳細は Extensions, bug fixes and updates for Zenject を参照
Extenjectのインストール
- releasesより
Zenject@v9.2.0.unitypackageをダウンロードし導入- Asset Storeからでも可
- 必要な項目のみチェックしてインストール
- 大事なのは
/Plugins/Zenject/OptionalExtras/TestFrameworkに必ずチェックを入れること - サンプルゲームなどは除外
- 大事なのは

Zenjectにおける自動テスト種別とそのポイント
共通
- 使用するDIContainerはテスト毎に再生成
- テスト毎にDIContainerはリフレッシュされる
- テスト時にBindしたものを、テスト後にUnbindするなどの処理は基本的に不要
Unit Test
- Injectされるオブジェクトのテスト
- UnitTest向けの
ZenjectUnitTestFixtureを使用
- UnitTest向けの
- BindによるInjectの挙動検証のテストも可能
- EditorModeでテスト
- UnityにおけるUnitTestと同様に、Unityライフサイクルを意識したテストは不可
Integration Test
- DIによる依存注入されるクラスのテスト
- PlayMode向けにカスタマイズされた
ZenjectIntegrationTestFixtureを使用
- PlayMode向けにカスタマイズされた
- Injectされるオブジェクトをモックなどに切り替えてテストを行う
- PlayModeでテスト
- Zenjectの Order Of Operations に従ってテストを実施するため
- Unityのライフサイクルを意識したテストが可能
- 空のシーンでスクリプトからテスト用オブジェクトを追加
Scene Test
- 予め作成したシーンを使ったIntegration Test
- シーン読み込み向けにカスタマイズされた
SceneTestFixtureを使用
- シーン読み込み向けにカスタマイズされた
- 既存のシーン内でInjectされるオブジェクトを切り替えてテストを行う
- PlayModeでテスト
- シーンをロードしてテストする以外はIntegration Testと同様
テストシチュエーション
今回は乱数を使ったゲームのテストを自動化することを想定してシチュエーションを作ります。
乱数生成器をそのままテストに使用すると想定した乱数が全然生成されず、まったくTestabilityを満たすことができません。
そこで、乱数生成器をDIする構成にして、テスト時は指定した数値を返す乱数生成器のモックをInjectしてテストを行ってみましょう。
登場クラス
- RandomScaler
- メインのテスト対象
- Randomizerから乱数を受け取って、オブジェクトのスケールを変更
- Randomizer
- Injectされるクラス
- [0.0, 1.0]の間で乱数を返す乱数生成器
- テスト時はモックに切り替えてインジェクト
テスト対象コードの作成
- RandomScalerはRandomizerから取得した乱数を元にGameObjectのScaleを変更するMonoBehaviour
- RandomizerはIRandomizerの実装クラス
using UnityEngine;
using Zenject;

public class RandomScaler : MonoBehaviour
{
    [Inject]
    private IRandomizer Randomizer { get; set; }

    void Start()
    {
        // 乱数によってスケールを変更
        float scale = Randomizer.value;
        this.transform.localScale = new Vector3(scale, scale, scale);
    }
}
/// <summary>
/// 乱数生成器のインターフェース
/// 乱数を[0.0f, 1.0f]で返す
/// </summary>
public interface IRandomizer
{
    /// <summary>
    /// 乱数を[0.0f, 1.0f]で返す
    /// </summary>
    float value { get; }
}
using UnityEngine;

/// <summary>
/// 通常の乱数生成器
/// </summary>
public class Randomizer : IRandomizer
{
    public float value => Random.Range(0.0f, 1.0f);
}
Scripts直下にTestTargets AssemblyDefinition を作成

テスト種別それぞれの実装例
Randomizerモックを作成
RandomScalerのテストを作成する前に、RandomizerのモックFixedRandomizerを作成しましょう
モック用のAssemblyDefinitionを作成
/Tests/MockTest/フォルダを作成- フォルダで右クリック -> Create -> Assembly Definition
- 名前は
TestMocks - 各種設定を追加
- Define Constraintsに
UNITY_INCLUDE_TESTSを入れることでビルド後のManagedから除外されます
- Define Constraintsに
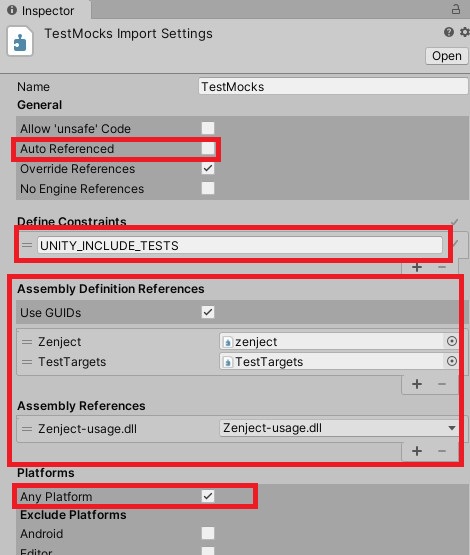
FixedRandomizerを作成
- 指定された乱数値を返すIRandomizer実装クラス
FixedRandomizerを用意- 乱数値を固定化することでテスト時の挙動を一定化
- 要するに乱数器の皮をかぶったテスト用モックに変更
using Zenject;

/// <summary>
/// 毎回固定値を返すRandomizer
/// </summary>
public class FixedRandomizer : IRandomizer
{
    [InjectOptional]  // Injectにより数値の変更可能
    public float FixedValue { get; set; } = 0.0f;

    /// <summary>
    /// 乱数ではなく固定値を返す
    /// </summary>
    public float value => FixedValue;
}
Unit Test
RandomScalerにDIする前に、DIされるFixedRandomizerのテストを実施
1. Test Runnerを開き、EditMode用TestAssemblyを作成
Test RunnerタブでEditMode -> Create EditMode Test Assembly Folder

UnitTest用AssemblyDefinitionの作成 Assembly DefinitionにReferencesなどを設定
zenject,Zenject-TestFrameowrk,Zenject-usage.dllを追加TestTargets,TestMocksを追加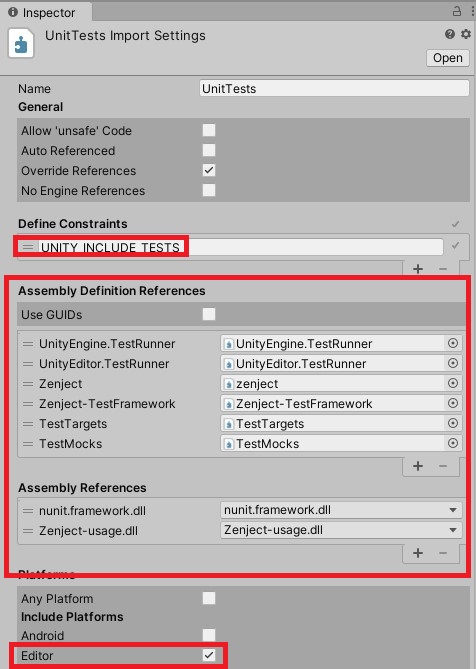
UnitTest用AssemblyDefinitionの設定
2. FixedRandomizerTestを作成
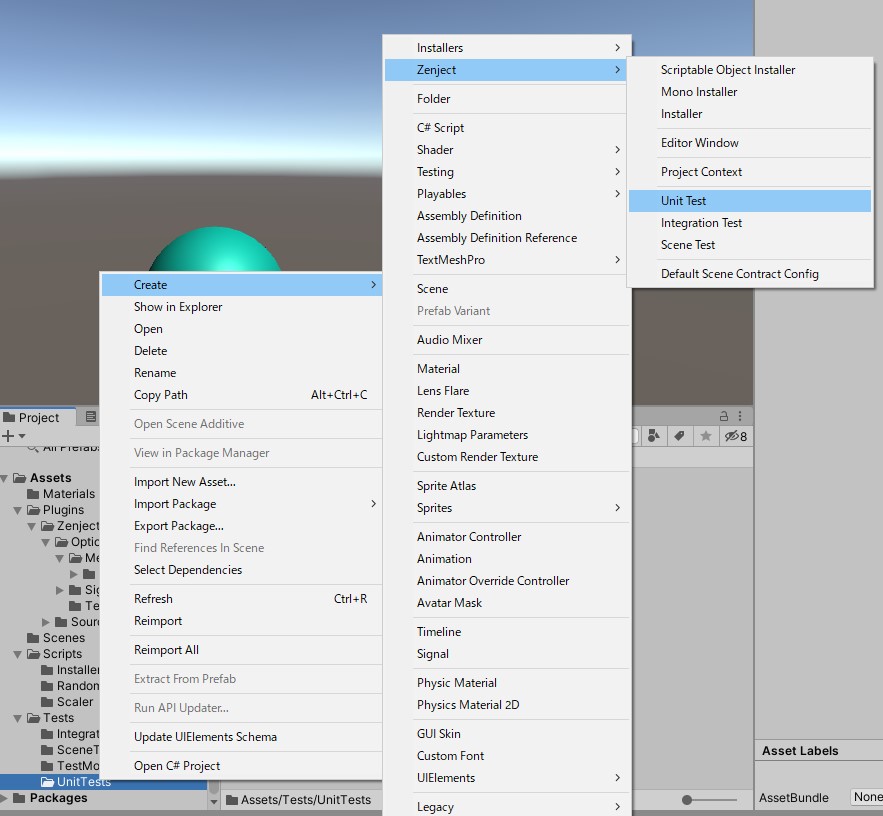
- ZenjectによりBindし、InjectされたFixedRandomizerをテスト
- FixedRandomizerにInjectされたFixedValueのテストも併せて実施
- PlatformはEditor
using Zenject;
using NUnit.Framework;

[TestFixture]
public class FixedRandomizerTest : ZenjectUnitTestFixture
{
    // テスト対象
    [Inject]
    IRandomizer _target;

    const float injectedValue = 0.75f;

    [SetUp]
    public void CommonInstall()
    {
        // Bindの実施
        Container
            .Bind<IRandomizer>()
            .To<FixedRandomizer>()
            .AsSingle()
            .WithArguments<float>(injectedValue);  // FixedRandomizer.FixedValueにInjectするfloat値

        // DIの実施
        Container.Inject(this);
    }

    /// <summary>
    /// Inject結果の検証
    /// </summary>
    [Test]
    public void TestInjectType()
    {
        Assert.IsInstanceOf<FixedRandomizer>(_target);
    }

    /// <summary>
    /// Injectされた固定値を返すことの検証
    /// </summary>
    [Test]
    public void TestInjectedValue()
    {
        Assert.AreEqual(injectedValue, _target.value, 0.0f);
    }

    /// <summary>
    /// 指定した固定値を返すことの検証
    /// </summary>
    [Test]
    public void TestFixedValue()
    {
        (_target as FixedRandomizer).FixedValue = 0.25f;
        Assert.AreEqual(0.25f, _target.value, 0.0f);
    }
}
UnitTest実装のポイント
.WithArguments<float>(injectedValue)はFixedRandomizer内で[InjectOptional]が付いたfloat変数にInjectされるContainer.Inject(this)によりテストクラス内の[Inject]が付いた変数に該当するクラスインスタンスがInjectされる
3. UnitTestの実施
- Test Runner -> EditMode -> Run All (タブの左上)
IntegrationTest
RandomScalerにFixedRandomizerをDIしてテストを行う
1. Test Runnerを開き、PlayMode用TestAssemblyを作成
Test RunnerタブでPlayMode -> Create PlayMode Test Assembly Folder

IntegrationTest用AssemblyDefinitionの作成 Assembly DefinitionにReferencesなどを設定
zenject,Zenject-TestFrameowrk,Zenject-usage.dllを追加TestTargets,TestMocksを追加- PlatformはAny Platform

IntegrationTest用AssemblyDefinitionの設定
2. RandomScaleTestを作成

using Zenject;
using UnityEngine;
using UnityEngine.TestTools;
using System.Collections;
using NUnit.Framework;

public class RandomScaleTest : ZenjectIntegrationTestFixture
{
    // テスト対象
    [Inject]
    RandomScaler _target;

    const float fixedScale = 0.12345f;

    /// <summary>
    /// テスト毎に共通のInstall処理
    /// </summary>
    void CommonInstall()
    {
        PreInstall();

        // InjectされるRandomizer
        Container
            .BindInterfacesAndSelfTo<FixedRandomizer>()
            .AsSingle()
            .WithArguments<float>(fixedScale);  // Scale値をfloatとしてBindし、FixedRandomizer.FixedValueにInject

        // RandomScalerがアタッチされたGameObjectの生成してBind
        Container
            .Bind<RandomScaler>()
            .FromNewComponentOnNewGameObject()
            .AsSingle();

        // この処理で_targetにInject
        PostInstall();
    }

    /// <summary>
    /// 初期スケールが1であることのテスト
    /// </summary>
    [UnityTest]
    public IEnumerator TestInitScale()
    {
        CommonInstall();

        Vector3 localScale = _target.gameObject.transform.localScale;
        Assert.AreEqual(Vector3.one, localScale);

        yield break;
    }

    /// <summary>
    /// Start()後のスケールがfixedScaleであることのテスト
    /// </summary>
    [UnityTest]
    public IEnumerator TestAfterStartScale()
    {
        CommonInstall();

        yield return null;  // 1frame動かす

        Vector3 localScale = _target.gameObject.transform.localScale;
        Assert.AreEqual(new Vector3(fixedScale, fixedScale, fixedScale), localScale);
    }
}
IntegrationTest実装のポイント
PreInstall()とPostInstall()の間にBind処理を挟むPreInstall()はPlayModeにおける初期化処理を実施PostInstall()はテストクラスなどへのInject処理を実施
CommonInstall()メソッドを定義する必要はないが、公式ドキュメントの実装方針に準拠CommonInstall()後にyield return null;することて、シーン内のオブジェクトにInjectが実施される- Zenject Order Of Operationsの
Awake(),Start()が実施されるため
- Zenject Order Of Operationsの
3. IntegrationTestの実施
- Test Runner -> PlayMode -> Run All (タブの左上)
SceneTest
以下の動画のようなシーンを作成してテストに利用
テスト用シーンの作成
- シーン名は
RandomScaleSphereScene RandomScaleSphereオブジェクトにはRandomScalerを追加RandomizerInstaller(後述)でBindされたRandomizerがInjectされている
- シーンを起動するたびにオブジェクトのスケールが乱数値によって変更される
RandomizerInstallerの作成
使用方法はZenjectのInstallerと同様のため割愛
IRandomizerのBindとしてRandomizerを登録.IfNotBound()を追加- 実コードがテストに依存しているみたいであまり好きではないんですが、公式サンプルの
SpaceFighterTestもIfNotBound()を使用していたため準拠します - 詳しくは後述
- 実コードがテストに依存しているみたいであまり好きではないんですが、公式サンプルの
using Zenject;

public class RandomizerInstaller : MonoInstaller
{
    public override void InstallBindings()
    {
        Container
            .Bind<IRandomizer>()
            .To<Randomizer>()
            .AsSingle()
            .IfNotBound();  // 親のContextで登録されていたら、Bindしない
    }
}
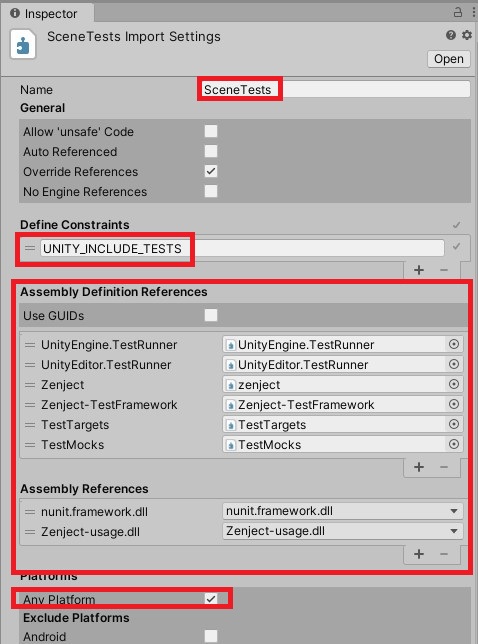
1. Test Runnerを開き、PlayMode用TestAssemblyを作成
※IntegrationTestと同じフォルダにテストを配置する場合は不要
- 「IntegrationTest」と同様
- IntegrationTestにて作成したAssemblyDefinitionをコピーしてしても良い
- Assembly Definitionの設定も同様
2. テストに使用するシーンを Scenes In Build に追加
LoadSceneを実施するため、Scene in Buildに登録する必要がある
- File -> Build Settings
Scene in BuildにシーンRandomScaleSphereSceneを追加(ドラッグ&ドロップ)
3. RandomScaleSphereSceneTestを作成
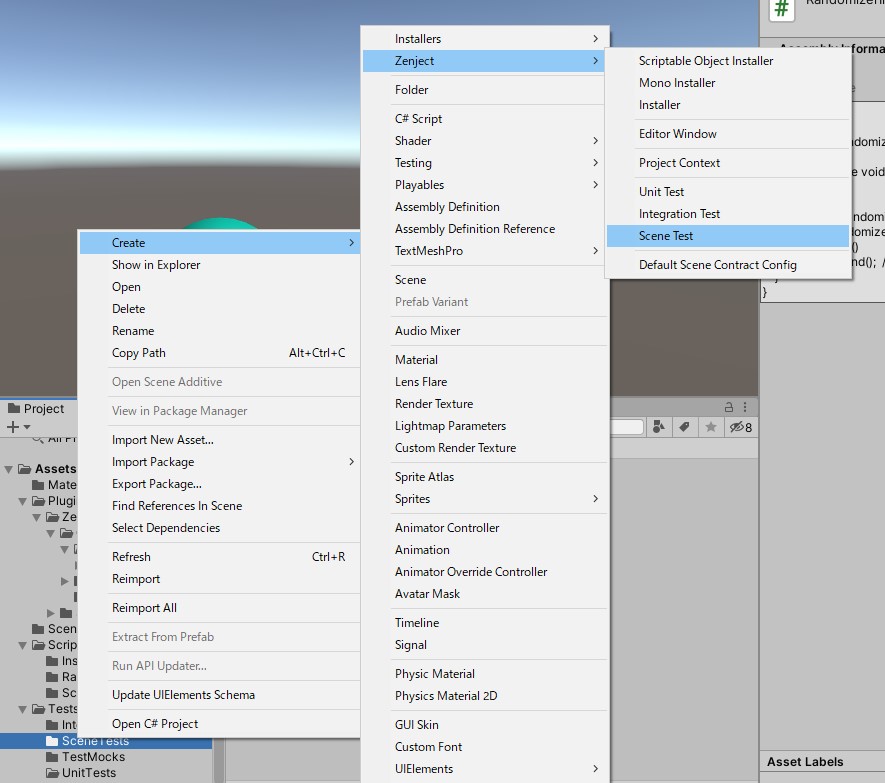
using Zenject;
using UnityEngine;
using UnityEngine.TestTools;
using System.Collections;
using NUnit.Framework;

public class RandomScaleSphereSceneTest : SceneTestFixture
{
    const string sceneName = "RandomScaleSphereScene";

    [UnityTest]
    [Timeout(5000)]  // タイムアウトは5秒(5000ms)
    public IEnumerator TestSceneStartup()
    {
        // シーンの読み込みが問題ないことの確認
        yield return LoadScene(sceneName);

        // シーンが問題なく開始していることの確認
        yield return new WaitForSeconds(1.0f);
    }


    [UnityTest]
    [Timeout(5000)]  // タイムアウトは5秒(5000ms)
    public IEnumerator TestSphereScaleWithFixedRandomizer()
    {
        float targetScale = 0.45678f;

        // InjectされるRandomizer
        StaticContext.Container
            .BindInterfacesAndSelfTo<FixedRandomizer>()
            .AsSingle()
            .WithArguments<float>(targetScale);

        // シーンの読み込み
        yield return LoadScene(sceneName);

        var resolved = SceneContainer.Resolve<IRandomizer>();
        Assert.IsInstanceOf<FixedRandomizer>(resolved);

        // テスト対象のGeameObjectを取得
        var targetObject = GameObject.Find("RandomScaleSphere");

        yield return null;  // 1frame動かす

        // Start()後のスケールを確認
        Vector3 localScale = targetObject.transform.localScale;
        Assert.AreEqual(new Vector3(targetScale, targetScale, targetScale), localScale);
    }
}
SceneTest実装のポイント
StaticContext.Containerに対してBindを行うStaticContextはProjectContextよりさらに上位のContext
SceneContainer.Resolveでシーン内のBind状態を確認可能[Timeout(X)]でタイムアウトを指定することが可能
StaticContextについて
- ZenjectのBindは
StaticContext->ProjectContext->SceneContext->GameObjectContextのような階層でStaticContextは一番優先度が低いRandomizerInstallerで.IfNotBound()を使用した理由はこのため- 公式サンプルでは
Override settings to only spawn one enemy to testとあるが正確にはオーバーライドではなく、.IfNotBound()で親Contextを優先させています - 実コードにテスト向けコードを追加している感があるため、
.IfNotBound()をつけなくてもオーバーライドする方法が判明したら共有します
サンプルプロジェクト
雑感
結構詳細に実装までの流れを載せたので読みづらかったらすみません。。。
ここ最近Zenjectの存在を知って勉強していたので、共有も兼ねて記事を書いてみました。
DI系のライブラリやフレームワークは結構好きで、Zenjectもかなり気に入っています。
StaticContextやUnitTestのために.IfNotBound()を使うのは少し残念かなって思ったぐらいでしょうか。
また、Extenjectが出てくるなど保守周りは調整中のような空気を感じました。
.WithKernel周りにもまだバグがあるようなので、余裕があったら調査してみようと思います。
最後まで読んでいただきありがとうございます!
何かのお役に立てばと思います。